




"Design a House with AutoCad Architecture 2018"
Published - Copyright© 2019 by Pantelis Skourtis
At this step, you will draw the architectural plans of the project house21-190, the floor plan of the basement, the plan of the ground floor, the plan of the first floor and the floor plan of the roof - attic. Then you will draw the 2D site plan and the 3D Terrain drawing.
These plans can then be used, with the usual procedure of Autocad Architecture, to create the rest of the architectural drawings such as sections, elevations, 3d Views etc.
The ACA (AutoCad Architecture) software provides special tools to organize your projects so that you can create drawings and project information in the quickest and easiest way. You will apply this procedure during the designing of this project as described in step "4. Drawing Management".
The floor plans and site plans that you will draw in this phase, will be used later in stepr '5' to create the Construct Drawings which form the core of the work drawings.
- Details
"Design a House with AutoCad Architecture 2018"
Published - Copyright© 2019 by Pantelis Skourtis
2.1.6 - Create the Slabs of the Basement
The next step is to create and place two simple concrete slabs with thickness 0.20 m, one on the floor and the other one on the roof of the basement, using the tool Slab .
Open drawing h21190_basem_openings, that you created in the previous lesson 2.1.5, display it in 3DView and apply to this plan the Conceptual view, as shown in Fig.2.1.6.1.

With the tool Slab, you will use a closed polyline - the outline of the basement - to create a single slab that has the properties of the tool (Slab) you selected.
After you create this object, you can then change its properties.
Create the floor slab of the basement
You can select the Slab tool on Ribbon > Home tab > Build panel > Roof Slab fly out menu (hover on ►) >select Slab, or for this example, you can select it from Tool palette - Design (Fig. 2.1.6.2).
-
Fig.2.1.6.2 - Tool Palette - Design 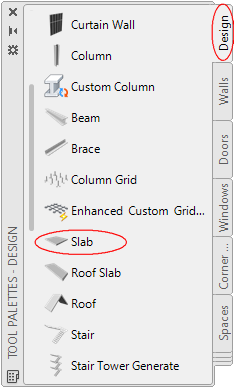
-
Fig.2.1.6.3 - Tool Palette - Design - Slab 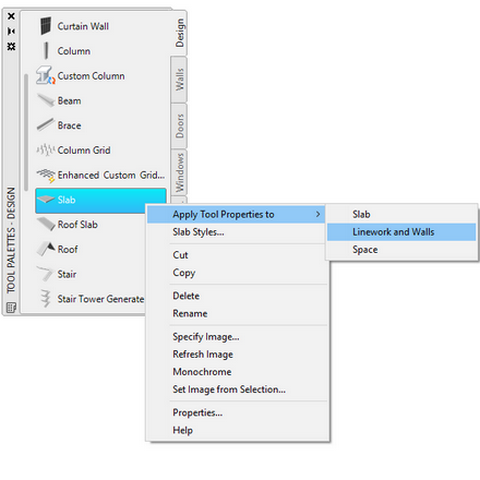
- Locate or design the closed polyline (abgha), this is the outline of the basement, at level 0.00 (Fig.2.1.6.1).
- Locate or design the closed polyline (abgha), this is the outline of the basement, at level 0.00 (Fig.2.1.6.1).
- Open the Tool palettes- Design (Fig. 2.1.6.2) that contains the tool Slab - the slab you want to use - (you may have to scroll to display the desired tool).
- Right click on the tool Slab, and click on Apply Tool Properties to ► Linework and Walls (Fig.2.1.6.3)
- Select the closed polyline (abgha), and press ENTER.
It is possible to notice, that you can not select the polyline, because it overlaps with other objects. Use the Selection Cycling (status bar button), that controls the display behavior when you hover over or select an object that overlaps other objects. This button controls whether a badge or the Selection dialog box displays when you hover over or select an overlapping object. You can choose between overlapping objects by pressing Shift+Space or by using the Selection dialog box. Make sure that Selection Cycling is turned on. As you roll your cursor over objects, you will see an icon indicating that multiple objects are available for selection, from these objects select the polyline.
 - Press n (No) to keep the polyline in the drawing.
- For the Creation Mode: select p (Projected).
- For Specify Base Height: type the value 0.
- For the Specify Slab Justification: select Bottom.
- At the prompt Select the pivot edge of the slab: select line (ab) and press ENTER.
- At the Properties palette of the slab that will appear,on category Dimensions locate tab Thickness (Fig.2.1.6.4), change it's value to 0.20 (it is, in meters, the width of the basement floor slab), on category Location locate tab Elevation, change it's value to 0.20, and press Enter and Enter again.
- Before you continue, open the Layer Properties Manager, select layer A-Slab that is created automatically with object slab, click on it's color and set it to 21. (The only reason for editing this layer's color for slab, is to distinguish visually the slabs from the walls and other objects, while it is at conceptual view).
- The slab of the basement floor has been created as shown in Fig. 2.1.6.5.
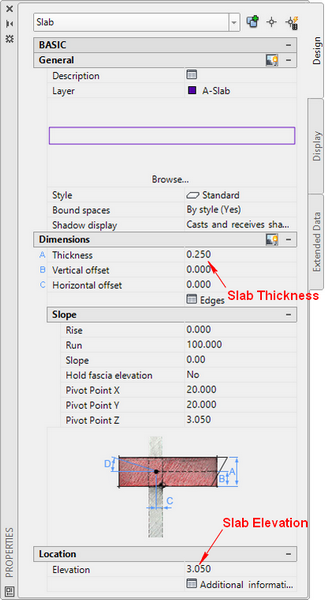

B.-Create the roof slab of the basement
- Locate or design the closed polyline (abgha), this is the outline of the basement, at level 0.00 (Fig.2.1.6.1).
- Open the Tool palettes- Design (Fig. 2.1.6.2) that contains the tool Slab - the slab you want to use - (you may have to scroll to display the desired tool).
- Right click on the tool Slab, and click on Apply Tool Properties to ► Linework and Walls (Fig.2.1.6.3)
- Select the closed polyline (abgha), and press ENTER.
- Press n (No) to keep the polyline in the drawing.
- For the Creation Mode: select p (Projected).
- For Specify Base Height: type the value 2.80.
- For the Specify Slab Justification: select Bottom.
- At the prompt Select the pivot edge of the slab: select line (ab) and press ENTER.
- At the Properties palette of the slab that will appear,on category Dimensions locate tab Thickness (Fig.2.1.6.4), change it's value to 0.20 (it is, in meters, the width of the basement floor slab), on category Location locate tab Elevation, change it's value to 3.20, and press Enter and Enter again.
- The slab of the basement floor has been created as shown in Fig. 2.1.6.6.

Save the drawing under the name h21190_basem_slabs in the folder you have created earlier.
Its full path is: C:\ACA\myProjects\house21_190\customDwg\basement\h21190_basem_slabs.
- 2.1.5 - Basement - Place the Windows
- 2.1.4 - Basement - Place the Doors
- 2.1.3 - Basement - Interior Walls
- 2.1.2 - Basement - Exterior Walls
- 2.1.1 - Basement - Create the Outline
- 2.2.9 - Ground floor - Exterior stair - Railing
- 2.2.7 - Ground floor - Interior Stair
- 2.2.4 - Ground floor - Place the Doors